Creating a moving platform in Godot is now very easy thanks to the new Animatable Body node in Godot 4. In this lesson, I will show you, step-by-step, how to create a moving platform.
Would you like to download the resources and files for this Moving Platforms in Godot 4 project?
STEP 1: Create a new project in Godot
Create a new project in Godot. I like to keep smaller tutorials in separate project files so that I can quickly refer to them. Having smaller projects with basic functionality serves as a reference manual.
STEP 2: Create a new 2D node
Add a 2D node and name it Level (or whatever you wish).
STEP 3: Add an AnimatableBody2D
Add an AnimatableBody2D child node to the Level and rename it to MovingPlatform.
STEP 4: Add a ColorRect and CollisionShape2D
Now add a ColorRect and a CollisionShape2D as children of the MovingPlatform. I am just using a ColorRect for this tutorial but you could add your own sprite.
STEP 5: Adjust the ColorRect size to suit
With the ColorRect selected, adjust its size to that of the platform size you require.
STEP 6: Defining the Collision Shape
With the CollisionShape2D selected, add a New RectangleShape2D in the Shape dropdown in the Inspector. Then adjust the size of the collision shape to match the size of the platform.
STEP 7: Group and Move the Platform
With the MovingPlatform node selected, click on the Group Nodes icon to group the MovingPlatform and its children.
Now move the platform into the main game window.
STEP 8: Add an Animation Player
With the Level node selected, add an AnimationPlayer child node.
STEP 9: Add a New Animation
In the Animation panel, click on the word Animation and select New to add a new animation. In the small popup, give your animation a name. I called mine ‘move’.
STEP 10: Animating the Platform
With the MovingPlatform node selected, click on +Add Track.and select Property Track.
In the popup window, select the MovingPlatform node and then click on OK.
FINDING THIS TUTORIAL USEFUL?
If you are finding this tutorial useful then please consider making a small donation
to help with the running costs of this site.
Now select the position property and then click on Open.
In the Inspector, open up the Transform options and click on the key to the right of Position.
You should see that a keyframe has been added in the animation timeline.
In the animation timeline panel, click on the icon to move the playhead to the end of the animation timeline (which is currently set to 1 second).
With the MovingPlatform node selected, move the platform to the position where you would like it to end its animation. I am just moving my platform to the right. I will hold down my SHIFT key as I move the platform so that it only moves horizontally as I move it to the right.
Then click on the key next to the position property in the Inspector panel.
You will now see a second keyframe in the animation panel.
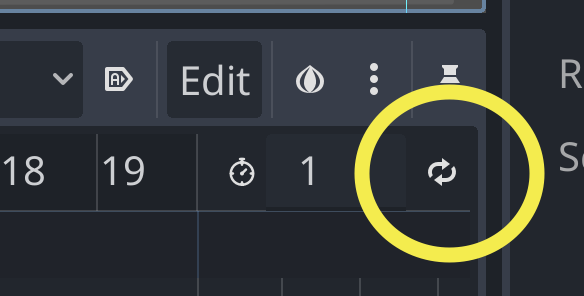
To the right of the animation panel you will see an icon that consists of 2 arrows in a circle formation.
Click on this icon until it shows the icon below. This represents a forward and reverse animation. The platform will animate right and then left (in my example).
If you click on the PLAY icon you should see your platform animation.
ADDING A SCRIPT TO START THE ANIMATION
If you would like to add a script to start your animation then select the root Level node and add a script by clicking on the script icon.
In the popup, leave everything set to default settings and click on Create.
Add the code as shown on Line 6.
Congratulations. Your platform should now animate when you play your level.
Did you find this tutorial helpful? Please leave a comment and consider making a small donation to help with the costs to run this website.


